My First Solar Powered Boat Project

Collapse
X
 
  • Time
  • Show
Clear All
new posts
  • dudevato
    Member
    • Mar 2014
    • 34

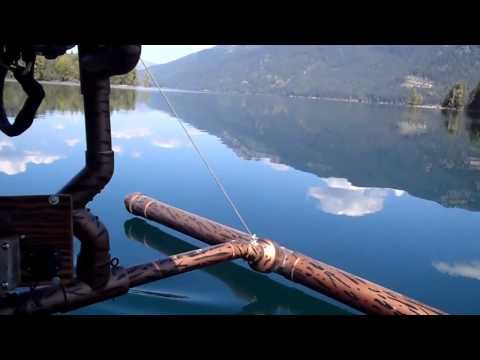
    doing some more work to secure my outrigger

    Tommy, I saw your pics on Yahoo Group LittleSolarBoats. I don't remember approving you as a member. I just give a quick look to see people are not wanting to post porn or offer Russian Brides and such. There were 7 members this morning and I just approved 3 more. A tri-maran owner and a pair of kayakers.

    I cut up and welded what will be my front outrigger mount yesterday. This will be Shoo-Gooed to the windsurf board. I scuffed up the bottom of the metal plate with a hand grinder. The dimensions of it are 3x5" or so.

    The surface of the board is a very ruff, non slip surface and I feel it will provide a very good surface to adhere to. If not I'll use Plan B

    For the rear mount I was able to use 4 embedded nut plates that take 3/16" fine thread screws.

    Spring is coming to Northern California. It was like 80* under blue (sunny) skies yesterday and it ought to be the same today.

    Back to the Yahoo Group briefly: I posted invitations to it on some 10 or 15 U Tube videos that showed up when I searched for Electric Kayaks - Solar Canoe - Trolling Motors - etc.

    I think the site will offer us a good place to post a lot of relevant info. Like links (and close up pics) of steering actuators and voltage charts, etc.

    Here's a thought you two might have already had: Do you have some kind of Dead Man's Switch wired up, so your rig doesn't head off into the sunset Without you? I'll have something rigged up, if it's only a 'holddown' for a spring loaded pushbutton switch

    Back to the Shoo Goo project - I put a dab of the stuff on the board yesterday. I'll be able to see if it's going to hold to my liking later today. I'll bet it does but will report back either way. later all

    Comment

    • TomCat58
      Member
      • Jun 2013
      • 97

      More testing the new build

      I tested out the new solar setup yesterday and covered 26 miles with mostly cloudy skies. The new build I did this winter is working better then I had thought it would Its been a long winter and I am looking forward to defrosting now....Next is testing under full sunshine soon ! serenity 1.JPGserenity 2.JPG Serenity solar canoe 3.jpg

      Comment

      • dudevato
        Member
        • Mar 2014
        • 34

        wow

        T, 26 miles? Wow!

        Comment

        • TomCat58
          Member
          • Jun 2013
          • 97

          Todd

          Todd check your private messages.

          Tommy

          Comment

          • SolarCanoe
            Member
            • Sep 2013
            • 71

            Multiple smaller batteries to save my back!

            I have been considering the LiFePo4 batteries for all the advantages but I already have a $200 MPPT Solar Charge Controller and it does not support the LiFePo4 batteries. It is not programmable other than selecting Flooded, AGM, or Gel batteries.

            One of the real attractions for me was the weight. A 100ah AGM weighs about 70lbs. One of the real deterrents is the cost. I can get a 100ah Smart Battery LiFePo4 battery that is a drop in replacement for a lead acid battery but it costs $765 for a 50Ah and $1443 for 100Ah.

            The weight of a 100Ah AGM battery is a real concern to me. The smaller 14 ft canoe is to be more portable and therefore we would be removing the battery and car topping the canoe regularly. 70 lbs of battery at my age and condition is just asking for trouble. So I am looking for a solution that would use two or three smaller batteries. I can get three AGM 35 Ah batteries for $300 and they each weigh less than 30 lb.

            I looked at 6v batteries but it seemed like it would end up being heavier and more expensive.

            That is all I have been up to lately but the snow is melting fast now.

            Comment

            • inetdog
              Super Moderator
              • May 2012
              • 9909

              Originally posted by SolarCanoe

              I looked at 6v batteries but it seemed like it would end up being heavier and more expensive.
              There may be some limitations based on the sizes that are made and commonly available, but just based on the chemistry and physics you should be able to get the same amount of energy from two six volt 70AH batteries in series as from two twelve volt 35AH batteries in parallel, and at the same weight.
              Given that, the series arrangement will be easier to maintain.
              SunnyBoy 3000 US, 18 BP Solar 175B panels.

              Comment

              • SolarCanoe
                Member
                • Sep 2013
                • 71

                Originally posted by inetdog
                Given that, the series arrangement will be easier to maintain.
                Why do you say it is easier to maintain two 6V batteries in series than two 12V batteries in parallel?

                Comment

                • Naptown
                  Solar Fanatic
                  • Feb 2011
                  • 6880

                  Originally posted by SolarCanoe
                  Why do you say it is easier to maintain two 6V batteries in series than two 12V batteries in parallel?
                  It has to do with balancing the charge and discharge between the two batteries. Minor resistance differences between connections and internal resistance in parallel will cause premature battery failure. In series this is not a problem.
                  NABCEP certified Technical Sales Professional

                  [URL="http://www.solarpaneltalk.com/showthread.php?5334-Solar-Off-Grid-Battery-Design"]http://www.solarpaneltalk.com/showth...Battery-Design[/URL]

                  [URL]http://www.calculator.net/voltage-drop-calculator.html[/URL] (Voltage drop Calculator among others)

                  [URL="http://www.gaisma.com"]www.gaisma.com[/URL]

                  Comment

                  • SolarCanoe
                    Member
                    • Sep 2013
                    • 71

                    Originally posted by Naptown
                    It has to do with balancing the charge and discharge between the two batteries. Minor resistance differences between connections and internal resistance in parallel will cause premature battery failure. In series this is not a problem.
                    Does this imbalance effect charging or using the batteries?

                    If I purchase the same batteries at the same time and use the same length of wire to connect the batteries to a common bus bar will that minimize the the effects of the imbalance?

                    Comment

                    • Naptown
                      Solar Fanatic
                      • Feb 2011
                      • 6880

                      Originally posted by SolarCanoe
                      Does this imbalance effect charging or using the batteries?

                      If I purchase the same batteries at the same time and use the same length of wire to connect the batteries to a common bus bar will that minimize the the effects of the imbalance?
                      It effects both charge and discharge.

                      You can be extremely careful with wire lengths crimps etc but all it will take is a difference in the internal resistance of the batteries some crud on a connection and the balance will be off.
                      NABCEP certified Technical Sales Professional

                      [URL="http://www.solarpaneltalk.com/showthread.php?5334-Solar-Off-Grid-Battery-Design"]http://www.solarpaneltalk.com/showth...Battery-Design[/URL]

                      [URL]http://www.calculator.net/voltage-drop-calculator.html[/URL] (Voltage drop Calculator among others)

                      [URL="http://www.gaisma.com"]www.gaisma.com[/URL]

                      Comment

                      • Patti8176
                        Junior Member
                        • May 2014
                        • 1

                        All I can say is wow. What cool projects, and now I have build something similar. Thanks for the great ideas.

                        Comment

                        • dudevato
                          Member
                          • Mar 2014
                          • 34

                          Patti, There's a Yahoo Group I started a while ago called LittleSolarBoats that now has 20 members.

                          Myself and Tommy (of Serenity Canoes) are the main posters. We'd love another interested party. Check it out.
                          Then post a pic of your project.


                          Latest news coverage, email, free stock quotes, live scores and video are just the beginning. Discover more every day at Yahoo!

                          Comment

                          • SolarCanoe
                            Member
                            • Sep 2013
                            • 71

                            Back In The Saddle

                            I'm afraid my solar boat projects have had to take a back seat to getting some much needed renovations and repairs done to the house. We have decided that it is necessary for us to move to a house with a garage more suitable for my projects. That means a garage something like this one:

                            Big_Garage.jpg

                            In addition to us wanting to move out of the city to a larger house, my sister-in-law's husband passed away and her financial situation may mean she will be coming to live with us, so that is another reason for us to want to move to a larger house that will accommodate all of us.

                            So I have not had time to work on these projects until the last day or so.

                            I first made an extension cord for the trolling motor so I can move the batteries to the center of the boat. I used a 12 foot set of booster cables that are 6 gauge all copper wire. After removing the clamps and doing some creative cutting, I came up with the following:

                            IMG_0258_small.jpgIMG_0257_small.jpgIMG_0259_small.jpgIMG_0262_small.jpgIMG_0260_small.jpgIMG_0263_small.jpgIMG_0264_small.jpg

                            I don't expect the little box to keep the connections dry but I needed a way to keep them insulated from each other. In fact I may find that water will get into the little box and get trapped, so I may need to drill some drain holes.

                            I also worked on the battery parallel connections. I developed a method of making large crimp-on terminations for the 6 gauge battery jumper wire using copper tubing. I made one set of cables to develop the manufacturing process, but I need to get some shrink tubing and I will then photograph and document the process. For now here are some photos to look at:

                            IMG_0266_small.jpgIMG_0268_small.jpg

                            I numbered the batteries so that I always connect them in the same order. When the batteries are not connected together the short cables will get attached back to the same terminal to ensure they don't accidentally get shorted.

                            Comment

                            • TomCat58
                              Member
                              • Jun 2013
                              • 97

                              Originally posted by SolarCanoe
                              I'm afraid my solar boat projects have had to take a back seat to getting some much needed renovations and repairs done to the house.
                              Wow a garage like that would be excellent. I hope all your plans come together for you......

                              I think my last build worked out pretty good and I have been spending more time on the water and not much time working on it. A few days ago I explored a nice lake high up in the Cascade Mountains. Here are a few pictures and a short video from Lake Kachess. Hope it inspires a few people to push forward with there solar boats lake Kachess 1.JPGLake Kachess 2.JPGLake Kachess 3.JPGLake Kachess 5.JPGLake Kachess 6.JPGLake Kachess 7.JPG


                              Tommy
                              Access Google Sites with a personal Google account or Google Workspace account (for business use).
                              Last edited by inetdog; 08-20-2014, 11:18 PM. Reason: fixed quote tag

                              Comment

                              • SolarCanoe
                                Member
                                • Sep 2013
                                • 71

                                Today I finished making the jumper wires for the batteries. As promised hear are some photos of how I made the crimp terminals.

                                Strip about 1/2 inch of the wire. Cut off a piece of copper tubing and drill a 1/8 inch hole near one end.
                                IMG_0270_small.jpg

                                Insert the wire in the end of the tube where the hole is. Use a pair of tile nippers to crimp the tube where the 1/8 inch hole is.
                                IMG_0271_small.jpg

                                Flatten the tube up to the 1/2 inch crimp end.
                                IMG_0272_small.jpg

                                Use a torch to heat the tube away from the wire and insulation. Feed the solder into the 1/8 inch hole in the tube.
                                IMG_0273_small.jpg

                                Drill a hole in the flat end to accommodate the size of screw you are using for the terminals.
                                IMG_0274_small.jpg

                                Trim the length of the flattened copper area and snip a slot. This will allow you to make the connection without removing the nut completely.
                                IMG_0275_small.jpg

                                Use a file to round off the corners and remove any rough edges.
                                IMG_0276_small.jpg

                                That is how I made the crimp terminals. The end of the wire that stays attached all the time does not have a slot cut in it.

                                Comment

                                Working...