
 Tweet
Tweet
Guys,
I have seen a link to a site showing the best way to wire batteries. Anybody have that handy?
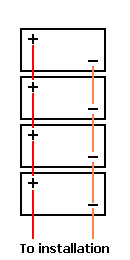
I have 8x12v batteries that I want to wire in 4 strings of 2 batteries to make 24v (no need for 48v as its just for lighting and the batteries are free)
Where should the inverter be connected to in the string?
Thanks...Kent
I have seen a link to a site showing the best way to wire batteries. Anybody have that handy?
I have 8x12v batteries that I want to wire in 4 strings of 2 batteries to make 24v (no need for 48v as its just for lighting and the batteries are free)
Where should the inverter be connected to in the string?
Thanks...Kent

Comment