 Tweet
Tweet
Nice job 
-
-
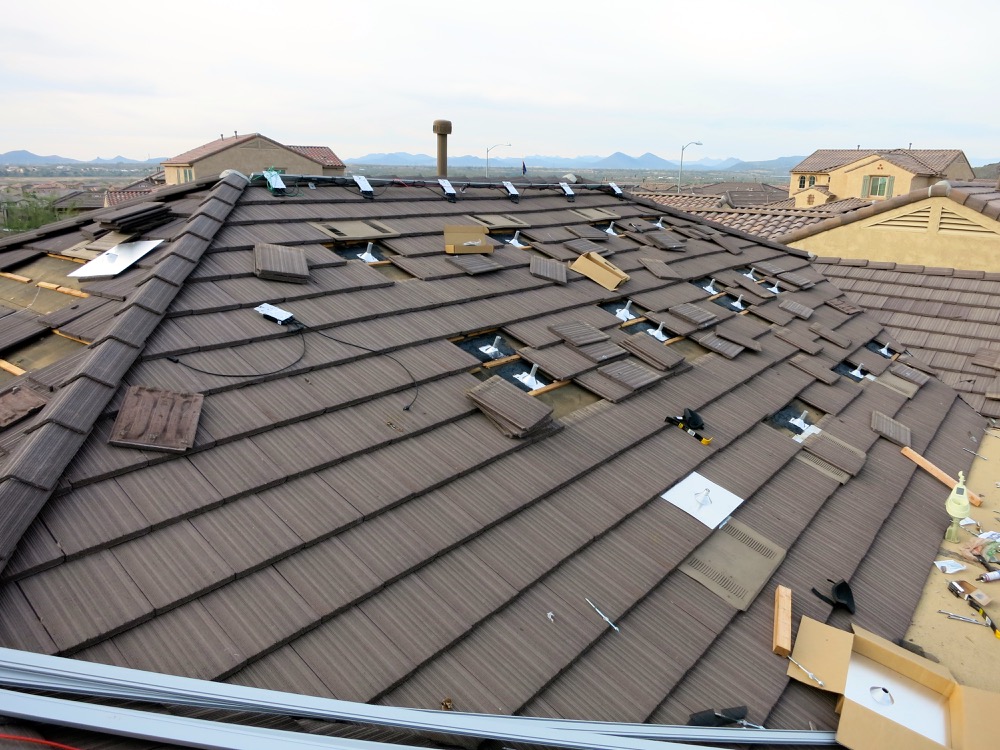
LOL yeah, this was what it was supposed to look like. Did all the work myself, the installer the was not part of it.
The stud finder detects nails in the rafters and while it may detect a stray one, you can easily verify th stud by checking for a second or third nail vertically from the same spot. My $40 electronic stud finder couldn't detect squat.Comment
-
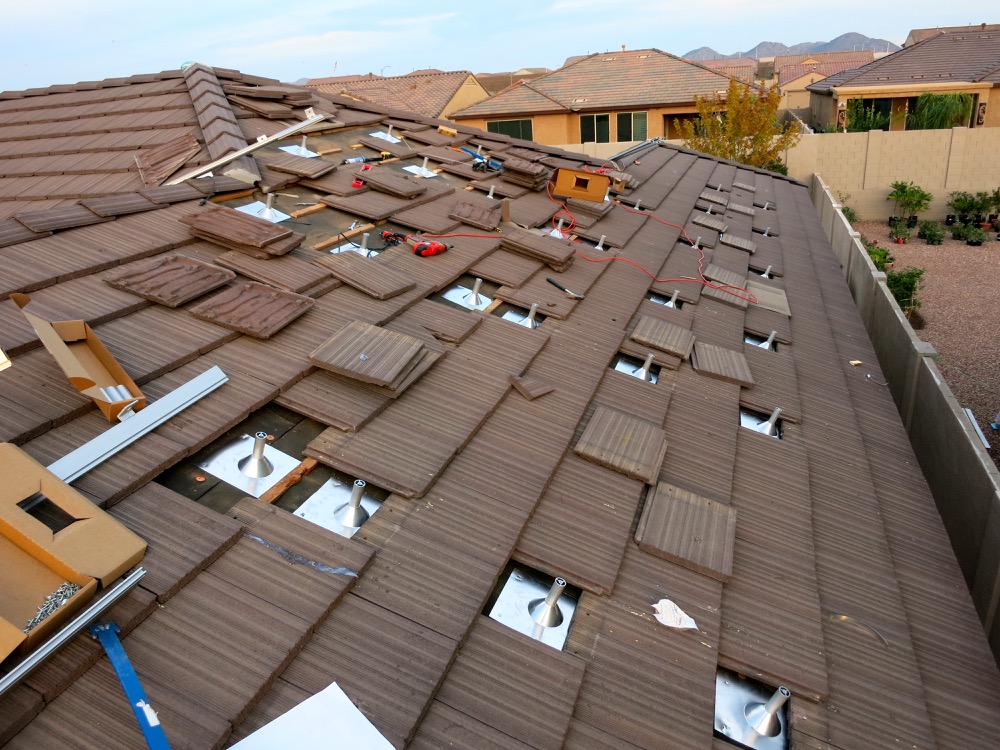
So is this double layer flashing? The bottom flashing is on top of the underlayment and the top flashing is on top of the tile? It looks like one of your pics show flashing on top of the tile as well so that's why I'm asking.Comment
-
Yes, it's double flashed like you described. The top flashing will also have a rubber donut with a sealant head over the top as an extra measure.
Alternatively you can also place the second flashing under the tile for aesthetics, so it would be the first flashing on the tar paper underwater, then a second flashing resting on the batton and then the tile on top. While it may look better, I feel better about the second flashing above the tile.Comment
-
I assume that you're also positioning the posts in the proper places now to dictate where the railings should go per the permit to avoid potential fire code violations that could have been caused by the original posts' positions.
So now the only battle left is to make sure your contractor use the correct wiring sizes per the permit spec, right?
I asked my installer about a competitor's bid claiming they use double flashing on their installation to see what kind of flashing my (yet to be chosen) installer uses. They sent me a spec of the flashing they use from Verde Insdustries in Phoenix. Here's a video of the single flashing they sell that's used by my installer. My roof has curved tiles just like on the video.
The sales guy told me he asked their crew chief for me why they don't use double flashing and the answer was that "to do it correctly requires cutting the underlayment of the roof. This technique occurs without any benefit for leakage on the roof. We've had several hundred installations using this flashing since 2007 and there has been 0 leaks from these systems."
Of course I knew nothing about flashing and it seems adequate and I didn't want them to mess around with cutting up my underlayment so I didn't push them to use a double flashed system. Also, in the video, it looks real clean on how they screw in the base of the post, right on top of the underlayment, then the post goes on top, with minimal ripping of the underlayment anyway.
But now that I see how you just tar up around the bottom flashing in your picture, I don't see why there's a need to cut the underlayment at all. Unless you want the underlayment to go over the top area of the flashing while the bottom area of the flashing goes over the underlayment because you don't trust that the tar coat is adequate to keep the moisture out on the top area of the flashing over the years and you want to have the underlayment on top of the top area of the flashing to achieve the water cascading effect.Comment
-
Yes, the panels will now be in landscape mode as originally designed to meet fire code setback.
For the underlayment flashing, there are two recognized and approved methods. One is like you mentioned with cutting part of the tar paper but that is really only when you can easily overlap the above layer over the flashing. The other is how I did it, which is called the 3-course method. You can see how both are done in this video from QuickMount PV: http://youtu.be/4cLt6YHGAFc
The only reason I can think of an installer not wanting to do it like this is labor and cost. With the Verde System you posted, it looks like the post is held in place with one lag screw and I didn't see any sealant used at all, I would think at a minimum a bead of sealant should at least be put around the post base. It's probably fine, I mean a lot has to happen for water to get into that hole but who knows over years and year guess. The QuickMount PV does seem a bit overkill but it can't hurt right?Comment
-
You probably already know it but, just in case, my installer also put a rubber piece above the base to make it water tight. See attached picture. He also used QuickMount posts. I see the same is recommended in the video you linked.
DSC_0116 (800x532).jpg16xLG300N1C+SE6000[url]http://tiny.cc/ojmxyx[/url]Comment
-
Good point about putting a bead of sealant around the post base, but I can see why it may not be necessary because it's the base of the post, screwed tightly on top of the underlayment, and it does flare out around and cover the actual lag screw as well. So in a way, the post base kinda acts as a sealant so to speak. It has to be extremely wet for water to breach in because there's hardly any opening uncovered.
Yes, for sure I think having 2 lag screws for the post is better than 1. And I agree that it doesn't hurt to do double flashing to be extra safe, and that the only reason installers don't want to do it is to save money. Sure, it may be OK for the next 10-15 years but maybe 20-30 years down the road problems may arise if you don't have double flashing.
The thing is, though, that the underlayment should probably be replaced every 15-20 years anyway and by then you'll have to rip it all out to replace the underlayment anyway.
My house was 17 years old when I had the solar panels installed so I had a roofer add a new underlayment on top of the old one (only in the area where the panels are mounted). So I'm good hopefully for the life of the panels before it has to be changed again.
My roofer didn't rip out the old underlayment because he said they still look good for probably another 5-10 years at least, so he can just put the new one on top. Of course I'm sure it'll also save him some labor doing it this way to avoid ripping the old one out. But I don't see why it hurts to have 2 layers anyway if the old layer is still in good shape, so I didn't object either.Comment
-
In the video, cutting a square hole for the post looks kinda messy, although if you choose to put the flashing on top, the square hole won't be seen anyway.
But if you follow the Verde video I posted, it seems like using their recommended tool to drill a round hole will look much nicer if not also easier and faster as well.Comment
-
I'm not sure why they take the messy, unlcean cut approach in the Quick Mount video...the way Verde cut the hole should be able to be done here as well. I actually did buy a tool like that on Amazon but using a regular electric hand drill isn't doing it, I probably need whatever that guy is using. Maybe like you said since its under the flashing it doesn't really matter how it looks.Comment
-
Wow this is a lot to undertake! It's getting there. Freaking pain in the ass trusses though, they start running horizontally at one point which sucked trying to figure out, luckily I had photos of the house when the framing went up that I could reference and then it was a bit of poking around but it worked out (first picture below is the area where they run horizontal).


Comment
-
I'm more and more happy that this one is a ground mount. Bruce RoeComment


Comment